
19 minute read
In the last month, I’m working on two different PHP projects here at Facile.it: in the first one, which is new and still in development, I decided to adopt GitLab CI for the build, since we use GitLab CE for our Git repositories; I then created a continuous deployment pipeline for the staging environment, directly to a Kubernetes cluster, leveraging Docker Compose to make the configuration easier.
After, I decided to start migrating a previous, internal project of mine to the same approach, since it’s currently in production with a dumb approach that provokes some downtime during deployments; on the contrary, doing a rolling deployment with Kubernetes is surprisingly easy!
A few days ago David Négrier (@david_negrier) published a blog posts about his way of doing continuous deployment from GitLab CI:
Just blogged: "Continuous Delivery of a PHP application with @gitlab, @Docker and @traefikproxy on a dedicated server"
— David Négrier (@david_negrier) 19 gennaio 2018
https://t.co/6piVuNBa7x
// @coding_machine
This post immediately captured my attention, due to my current work: David in his post avoided the usage of Kubernetes to not add too much cognitive load, and wrote a very straightforward piece. On the other hand, in my case I wrote a kinda complicated pipeline, learning a few tricks and pitfalls in the process, so I decided to write this down and share my experience.
The basic CI pipeline
This is how my basic pipeline looks like when it’s building a branch while I’m working on it:
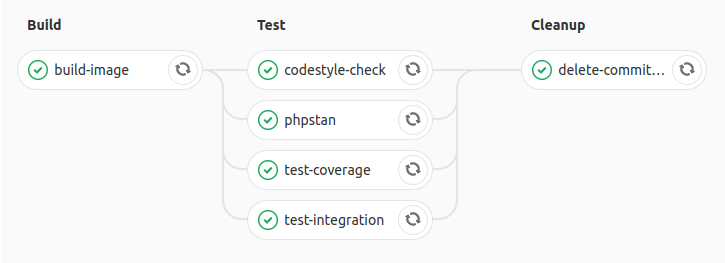
Three simple stages:
- Build CI: a CI image is built with the code baked in;
- Test: multiple jobs to do various verification tasks in parallel (tests, static analysis, code style…);
- Cleanup: deletion of the CI image built in the first step, to avoid bloating the Docker registry.
Let’s dive into the configuration details! For now, in the code examples, I will omit any piece that is needed for the deployment part; we will see that later.
The .gitlab-ci.yml configuration file
The GitLab CI is configurable just by adding a .gitlab-ci.yml file to the root of your project. The configuration for this first part looks like this:
image: gitlab.facile.it/facile/my-project/docker-compose:1.2

services:
- name: docker:17.12.0-dind
  alias: docker
  command: ["--registry-mirror", "https://registry-mirror.facile.it"]

variables:
  GIT_DEPTH: "1"
  DOCKER_DRIVER: "overlay2"
  DOCKER_HOST: "tcp://docker:2375"
The services section allows me to declare a Docker container that will be spun up by GitLab CI each time and that will host the Docker daemon that I will use. Here resides the main difference between David’s and my approach: in his case, he is using the host’s machine Docker daemon, in my case I’m using an isolated daemon, a real Docker-in-Docker approach.
The combination of the alias: docker setting and the DOCKER_HOST environment variable points our job to the D-in-D daemon socket; the --registry-mirror option let the daemon use our internal registry mirror to speed up pulling official images; last but not least, the DOCKER_DRIVER uses the overlay2 filesystem for the Docker build, which is faster and less space consuming (I suggest you to use that on your local Linux machines too!).
David’s approach may be a bit faster, because the daemon is always the same and retains some build and image cache between jobs and builds, but
it requires to run privileged jobs, andit’s not isolated, so it may incur in some issues or slowdowns if multiple builds run at the same time, messing up image tags.My approach is a bit more robust, but it’s overall slower, because each job is totally isolated (which is good), but on the downside it has no memory of previous builds, so no cache is available: we will have to pull from the registry each time.
2018-02-07 ERRATA: Stefano Torresi (privately) and /u/veloxlector (on Reddit) made me realize that my approach still requires a privileged runner, so that doesn’t change with my approach; the privileged execution is always required when doing Docker-in-Docker. This reduces my security claims, but my main aim was isolation.
The GIT_DEPTH option makes the project clone process in each job a bit faster, pulling only the current commit, not the whole Git history.
The image option allows you to require a different base image in which to execute each job of the pipeline. In my case the image is pretty simple, because it’s created from the base Docker image, and has in addition Docker Compose and kubectl, the command line interface for Kubernetes. My Dockerfile looks like this:
FROM docker:17.12.0-ce

ARG DOCKER_COMPOSE_VERSION=1.18.0
 # install Docker Compose
RUN apk add --no-cache curl py-pip bash \
    && pip install docker-compose
 # install kubectl
RUN wget https://storage.googleapis.com/kubernetes-release/release/v1.9.1/bin/linux/amd64/kubectl \
    -O /usr/local/bin/kubectl \
    && chmod +x /usr/local/bin/kubectl
Pipeline setup and Docker Compose configuration
The next part of my configuration looks like this:
stages:
  - Build
  - Test
  - Cleanup

before_script:
  - docker login -u gitlab-ci-token -p $CI_JOB_TOKEN $CI_REGISTRY
  - cp docker-compose.yml.gitlab docker-compose.override.yml
In here I configured the sequence of stages in the pipeline, and I configured a before_script section to be executed before each job. The first instruction logs into the private Docker registry that GitLab gives us along any project (if enabled), in which I decided to store my Docker images.
GitLab CI jobs automatically have the
$CI_JOB_TOKENand$CI_REGISTRYenvironment variables populated to easily do that: the first one is a fresh unique token, which is generated for each job; the second one is the URL of the registry associated with the current project; see the GitLab CI documentation for more details.
The second instruction depends on how I organized my Docker Compose files to help me during development and in the pipeline too. I use 4 separated files:
docker-compose.ymlis the base file, with the basic configuration.docker-compose.override.ymloverrides stuff when needed; the name is standard with the Docker Compose v3 configurations, so you don’t have to specify it in the CLI, it’s automatically picked up; this file is not committed and ignored by Git, because I use it to give each developer the freedom to customize the containers behavior, like ports or volumes.docker-compose.override.yml.distis a committed file with the suggested override configuration (default exposed ports, default mounts…).docker-compose.yml.gitlabis an override file that I use only during the build, so that’s why we need thatcpinstruction.
I will show you just the last file, which looks like this:
version: '3.2'

services:
  php:
    image: ${CI_IMAGE_COMMIT_TAG}
    build:
      dockerfile: docker/development/php-ci/Dockerfile
      context: .
      cache_from:
        - ${CI_IMAGE_BRANCH_TAG}
  php-cache:
    image: ${CI_IMAGE_BRANCH_TAG}
I declared in my php service both the image and build sections, so I’m able to use this definition in all my jobs, both for building and executing. I’m also able to move the Dockerfiles inside a dedicated directory, thanks to the usage of the dockerfile and context options with different paths.
It’s also very important to use version: '3.2', because it’s needed to use the cache_from option: since we do not have any cache in the daemon, I tag the image twice, once with the commit hash and once with the branch name; in this way I can pull the php-cache service with the branch tag as a cache from the previous build.
As you can see I’m using environment variables to define the image names. I do that in the GitLab CI configuration so I can define them only once and use them everywhere:
variables:
    # ...
    CI_IMAGE_NAME: facile/my-project/php-ci
    CI_IMAGE_COMMIT_TAG: $CI_REGISTRY/$CI_IMAGE_NAME:$CI_COMMIT_SHA
    CI_IMAGE_BRANCH_TAG: $CI_REGISTRY/$CI_IMAGE_NAME:$CI_COMMIT_REF_SLUG
I still leverage GitLab’s $CI_REGISTRY variable to compose the names, so basically my image names will be:
gitlab.facile.it/facile/my-project/php-ci:79aef00e3893a39102ffc394bf96782e57adb956gitlab.facile.it/facile/my-project/php-ci:branch-name
Just remember to use $CI_COMMIT_REF_SLUG for the second tag, because it has slashes and other invalid chars stripped out automatically.
A small trick: cache-friendly Docker images
To make this process work smoothly, you should write your Dockerfile in a cache-friendly manner. To obtain that, we must leverage the layer-based structure of the images, and put the stuff that changes more often in the latter layers, and vice versa the stuff that never changes up in the first ones. In this specific case we’re talking about a PHP/Symfony application and, starting from some advice that I got from my colleague Thomas, I wrote down this Dockerfile:
FROM gitlab.facile.it/facile/my-project/php-base

MAINTAINER Alessandro Lai <[email protected]>

ARG COMPOSER_FLAGS="--no-interaction --no-suggest --no-progress --ansi --prefer-dist"
ENV SYMFONY_ENV=test

USER blaine

COPY composer.* ./
RUN composer install $COMPOSER_FLAGS --no-scripts --no-autoloader
COPY . .
RUN composer install $COMPOSER_FLAGS \
    && bin/console cache:warmup --ansi --env=$SYMFONY_ENV
The base image that I extend contains everything that doesn’t change often: PHP version, extensions, a non-root user. Then, I start adding stuff on top, using this sequence:
- copy the
composer.jsonandcomposer.lockfiles; composer installto populate the vendor, using the--no-scripts --no-autoloaderoptions to skip anything else;- copy everything else (I use the
.dockerignorefile to avoid considering garbage files here, see docs); - repeat the
composer installstep, to dump the autoloader and run all thepost-installscripts; - warm up the Symfony cache, so we ship that with the image too.
In this way, I’m literally caching my vendor folder inside a single Docker image layer, and changing the Composer files will automatically invalidate that cache; also, copying all the other source files later allows me to not lose that layer when the vendor shouldn’t change.
Remember, that layer with the source code will change every time, since you’ve obviously just committed something new!
The jobs definitions
At this point we just need to define the jobs! The build job is defined like this:
build-image:
  stage: Build CI
  script:
    - docker-compose pull --ignore-pull-failures php-cache
    - docker-compose build php
    - docker tag $CI_IMAGE_COMMIT_TAG $CI_IMAGE_BRANCH_TAG
    - docker-compose push php php-cache
- pull the branch image as cache (
--ignore-pull-failuresavoids failures on the first commit of a branch); - build the image with the commit tag;
- re-tag the freshly built image with the branch tag;
- push both back into the registry.
Then we can pass onto the test stage. If I need multiple services, like for functional tests, I do it like this:
test-coverage:
  stage: Test
  coverage: '/^\s*Lines:\s*\d+.\d+\%/'
  script:
    - docker-compose pull --parallel php mysql
    - docker-compose run --rm php vendor/bin/phing ci
- pull all the needed images with the
--paralleloption to speed up; - run the needed task; in my case I use
phing(a PHP porting of Ant) inside the container to call everything with a single command; - The
coverageoptions contains a regex that picks up the coverage percentage from PHPUnit’s--coverage-textoption.
If instead I need to execute just simple tasks, without external services, I can skip the pull command completely:
phpstan:
  stage: Test
  script:
    - docker-compose run --rm --no-deps php phing phpstan_check
This is possible because I need just one image which will be pulled implicitly by Docker Compose, so the --parallel option is useless here; I also have to remember to use --no-deps to avoid pulling linked services, if for example my base configuration defines a dependency to other containers (like the database).
The scary part: deleting Docker images
Up until now, it was all straightforward and easy; the difficult part comes with the last stage, the cleanup.
With the process that I have shown this far, I’m building an image for each build, since I’m shipping my code inside the container; this approach is the most similar to what happens in production (that’s why I’ve chosen it), but it has a big downside: you may waste a lot of space with old images pushed to your Docker registry.
This issue is particularly annoying because there’s no automated feature in the GitLab’s registry to clean them up, up to the point where there are multiple, long-standing issues still open on their tracker about this problem:
- #20176 - Provide a programmatic method to delete images/tags from the registry
- #21608 - Container Registry API
- #25322 - Create a mechanism to clean up old container image revisions
- #28970 - Delete from registry images for merged branches
- #39490 - Allow to bulk delete docker images
- #40096 - pipeline user $CI_REGISTRY_USER lacks permission to delete its own images
Last but not least, Docker tags are not first class citizens for the Docker registry API (see this GitHub issue and the related PR).
What does that mean? Simply put, a Docker image tag is not a resource that you can easily delete using the Docker APIs, it’s a simple link. This means that you delete images, not tags; hence, if your image had multiple tags attached to it, you’re cascade-deleting all related tags without knowing.
To overcome those issues, I’ve tinkered a lot to obtain a clear and easy way to delete my CI image after the build. After many trial & error attempts, I obtained this workflow:
- push a dummy image to override the tag and point it elsewhere
- obtain a JWT token from the registry (with proper permissions for deletion)
- obtain the SHA digest of the dummy image
- delete the image (finally!)
The GitLab CI job is defined like this:
delete-ci-image:
  stage: Cleanup
  when: always
  script:
    - bin/docker-util/dummy-tag.sh $IMAGE
    - TOKEN=$(bin/docker-util/get-registry-token.sh $IMAGE)
    - MANIFEST=$(bin/docker-util/get-manifest.sh $IMAGE $TOKEN)
    - bin/docker-util/delete-image.sh $IMAGE $MANIFEST $TOKEN
when: always is needed to run the job even if the build fails. The other steps are conveniently stored inside bash scripts, for reusability.
Pushing a dummy image
The script that pushes the dummy image, dummy-tag.sh, accepts as a single argument the full Docker image name complete with tag:
#!/usr/bin/env bash

DIR='/tmp/docker-dummy'
mkdir -p $DIR

# generate a file containing a random string
head /dev/urandom | tr -dc A-Za-z0-9 | head -c 13 ; echo '' > ${DIR}/dummyfile
# generate the dummy image with only that one file
echo "FROM scratch" > ${DIR}/Dockerfile
echo "ADD dummyfile ." >> ${DIR}/Dockerfile
# build and push it
docker build -t $1 ${DIR}/
docker push $1
Using FROM scratch I’m able to create an empty image (see docs), so the final result is ~100 bytes, probably the smallest possible. I just store inside a single file with a randomized string, so the dummy image is different each time and I avoid issues with concurrent builds with concurrent push/delete actions on the registry.
Obtaining a JWT token from the registry
The script that obtains the token needs to know on which image we have to operate, because the permission are granted very specifically on that. Also, you will need to have a GitLab Personal Access Token available in an environment variable, because the normal token will not have enough permission to do what we need (it would be privilege escalation!):
#!/usr/bin/env bash

splitImageName $1

curl https://gitlab.facile.it/jwt/auth \
    --get \
    --silent --show-error \
    -d client_id=docker \
    -d offline_token=true \
    -d service=container_registry \
    -d "scope=repository:$IMAGE:pull,*" \
    --fail \
    --user alai:$PERSONAL_ACCESS_TOKEN \
    | sed -r "s/(\{\"token\":\"|\"\})//g"
The script, like before, requires as a single argument the full image name; the splitImageName function (omitted) just splits it and exports the result in 3 separated variables: $REGISTRY, $IMAGE and $TAG; we will need just $IMAGE for now.
So basically we issue a GET request to a GitLab API endpoint that looks like this:
https://gitlab.facile.it/jwt/auth?client_id=docker&offline_token=true&service=container_registry&scope=repository:facile/my-project/php-ci:pull,*
The last part, pull,* is really important: those are the permission that we are requiring, and the * is what will allow us to delete the image. Finally, the response will be in JSON, with a single token property, and sed will take care of stripping out all the JSON from the output.
Getting the image manifest
Now that we have the authorization part in place, we can start using the Docker registry API, which has a resource called manifest that describes an image. The get-manifest.sh script will require 2 arguments, the full image name (again) and the JWT token (that we just obtained):
#!/usr/bin/env bash

splitImageName $1

curl https://$REGISTRY/v2/$IMAGE/manifests/$TAG \
    --head \
    --fail \
    --silent --show-error \
    -H "accept: application/vnd.docker.distribution.manifest.v2+json" \
    -H "authorization: Bearer $REGISTRY_TOKEN" \
    | grep -i "Docker-Content-Digest" \
    | grep -oi "sha256:\w\+"
This time we are using all the 3 variables from the splitImageName function, and we are issuing a HEAD request, because what we need is a header of the response: Docker-Content-Digest. This header contains the SHA digest of the manifest, that we will use to reference what we want to delete in the next (and last) step. I then used grep twice: first to select the line of the output containing the header, and then to strip everything out except the digest.
The API endpoint looks like this:
https://gitlab.facile.it/v2/facile/my-project/php-ci/manifests/my-tag-that-i-want-to-delete
Deleting the image
Now that we have everything that we need, we can finally use the delete-image.sh script; it requires three arguments:
- the full image name (again)
- the SHA digest of the manifest
- the token (again)
#!/usr/bin/env bash

splitImageName $1
echo "Deleting image..."

curl "https://$REGISTRY/v2/$IMAGE/manifests/$2" \
    -X DELETE \
    --fail \
    --silent --show-error \
    -H "accept: application/vnd.docker.distribution.manifest.v2+json" \
    -H "authorization: Bearer $REGISTRY_TOKEN"
We are issuing a DELETE request to the manifest endpoint, using the SHA digest as an identifier for the specific resource that we want to delete; this last API endpoint looks like the previous one:
https://gitlab.facile.it/v2/facile/my-project/php-ci/manifests/9170f905754579832799afb8e65c89441c794596eb1c4fe2ac88e4a8ff1dfec0
Doing continuous deployment
Now that we have our CI pipeline in place, we can start doing continuous deployment! It’s just a matter of adding a few new jobs to the pipeline, and some stages too (new one in bold):
- Build CI
- Test
- Build prod
- Deploy
- Cleanup (with a new job)
Building images for the deployment
The new build prod stage will contain job(s) to build the container that will be shipped in production. I applied the same tricks as before, so I still write cache-friendly Dockerfiles, and I double-tag the images (with prod and prod-$CI_COMMIT_SHA) to use the previous one as cache, and to have a specific tag to use later, in the deploy job.
So, my build job does this simple sequence:
- pull with
--ignore-pull-failuresthe previous image, as before; - build the prod image with the specific
prod-$CI_COMMIT_SHAcommit tag; - push it back to the registry.
build-prod-images:
  stage: Build prod
  cache:
    paths:
    - node_modules/
  script:
    - docker-compose pull --ignore-pull-failures fpm-prod
    - docker-compose build fpm-prod
    - docker-compose push fpm-prod
  only: &deployable-branches
    - master
    - an-other-deployable-branch
Note that I’m not pushing the generic prod tag for now, I’m waiting to have a successful deployment first. This job can also be duplicated if you need to build multiple images with each deployment.
The other notable part of this job definition is the only directive. It’s obviously needed to make the job run only on certain branches, but the interesting part is the appended &deployable-branches string: it’s a YAML anchor. I’m basically bookmarking the array values for the only directive, so I can reuse them in the next CD jobs.
The deploy
Finally, we can deploy our application to the Kubernetes cluster!
deploy:
  stage: Deploy
  environment:
    name: prod
    url: https://my-project.facile.it/
  script:
    - kubectl set image deployment/my-project php-container="${PROD_IMAGE_PHP_COMMIT_TAG}"
    - kubectl rollout status deployment/my-project
  only: *deployable-branches
Using the YAML anchor reference *deployable-branches (yes, they use a pointer-like syntax) I reuse the previous values, so if I decide to deploy a new, particular branch, I don’t have to specify it in every deploy-related job, and risk forgetting one (yes, it happened to me).
Here we are finally using kubectl to do the deploy!
To authenticate into the cluster with
kubectl, you normally have to create a YAML config in your home directory; luckily, in the GitLab CI you can take a shortcut enabling the Kubernetes integration (see docs), so GitLab will login into the cluster using aserviceaccount, which is basically a login for non-humans. The integration will leverage environment variables to feed the configuration tokubectlautomatically, so you just have to issue commands with it, it will just work.
The deployment with kubectl is pretty straightforward: using the kubectl set image command we set a new image in our deployment configuration; the cluster will detect that we specified a different image and it will automatically start a rolling deployment to substitute the available containers with the new, requested tag.
Note that using a commit-specific tag is critical here, because otherwise the deployment will not be triggered; if you want to trigger a deploy without using specific tags, you will have to append the SHA digests of the image, with
image:tag@${SHA}; this will obviously mean that you will have to retrieve it, which can be less practical.
The next command, kubectl rollout status, watches the advancement of the deploy and exits with a status code that reflect the result of the rollout, so it’s perfect to be called in a build:
$ kubectl rollout status deployment/my-application
Waiting for rollout to finish: 1 old replicas are pending termination...
Waiting for rollout to finish: 1 old replicas are pending termination...
deployment "my-application" successfully rolled out
The environment option enable the usage of the GitLab Environments, so my deploys are tracked.
The cleanup after the deploy
As for the CI build, we will have to clean up older images after successfully deploying the application:
delete-old-prod-image:
  stage: Cleanup
  script:
    - bin/docker-util/delete-old-prod-image.sh $PROD_IMAGE_PHP_GENERIC_TAG $PROD_IMAGE_PHP_COMMIT_TAG
  only: *deployable-branches
I use the *deployable-branches here too, and a bash script to wrap everything in one file; the script will require two arguments (the generic and the commit-specific tag) and will execute this sequence of operations:
- retrieve a JWT token for the registry, as before;
- retrieve the SHA digest of the previous image, using the generic tag;
- pull the specific image;
- re-tag and push it with the generic tag;
- delete the previous image.
#!/usr/bin/env bash

OLD_IMAGE=$1
NEW_IMAGE=$2

echo "Retrieving manifests of previous image using generic tag..."
TOKEN=$(bin/docker-util/get-registry-token.sh ${NEW_IMAGE})
MANIFEST=$(bin/docker-util/get-manifest.sh ${OLD_IMAGE} ${TOKEN})

if [ "$MANIFEST" = "$(bin/docker-util/get-manifest.sh ${NEW_IMAGE} ${TOKEN})" ]
  then
    echo "The new image is identical to the previous one, no deletion necessary"
    exit 0
fi

docker pull ${NEW_IMAGE}
docker tag ${NEW_IMAGE} ${OLD_IMAGE}
docker push ${OLD_IMAGE}

echo "Deleting the previous image, using the previously fetched manifest..."
bin/docker-util/delete-image.sh ${OLD_IMAGE} ${MANIFEST} ${TOKEN}
The script executes a very important check before proceeding to re-tag and delete: it compares the SHA digest of the two images. This is needed because it’s possible to produce two identical images in two different builds, so we could be in the situation where the two tags point to the same image, and so nothing should be done. If the next build will produce a different image, the fact that the multiple previous tags point to the same image will mean that the cascade deletion will take care of all with a single action.
The last thing that I could add to this deploy pipeline is the cleanup in case the deployment fails; it would be identical to the delete-ci-image, with the only exceptions that I would use the prod commit-specific tags and I would set when: failure option. Since in GitLab CI each single job is retriable, I can retry the deploy without executing the whole pipeline from the start, so I decided to not implement it for now.
Conclusions
I hope that this (long) blog post will help people with this list of tips and tricks, and help save some time; many of the things that I wrote about here are not properly documented, so I learned them by trial and error and exercising some google-fu. I just hope that the GitLab registry will soon implement some easier and automatic way to do the cleanup, so all this hassle will be reduced to just a couple of YAML configuration lines.

Share this post
X
Facebook
Reddit
LinkedIn
StumbleUpon
Pinterest
Email